How to Take Notes on iPad: A Step-by-Step Guide (2027)
To take notes on an iPad, pair an Apple Pencil, pick one note-taking app, choose paper that fits the subject, and make one folder per course. Then use the same routine for every class: import the slides before the lecture, write on them during it, mark a ? wherever you get lost, and answer every ? after class while it is fresh. The rest of this guide walks through each step, from the Pencil settings worth changing to turning a page of notes into a study session.
The short version: one class, four moments
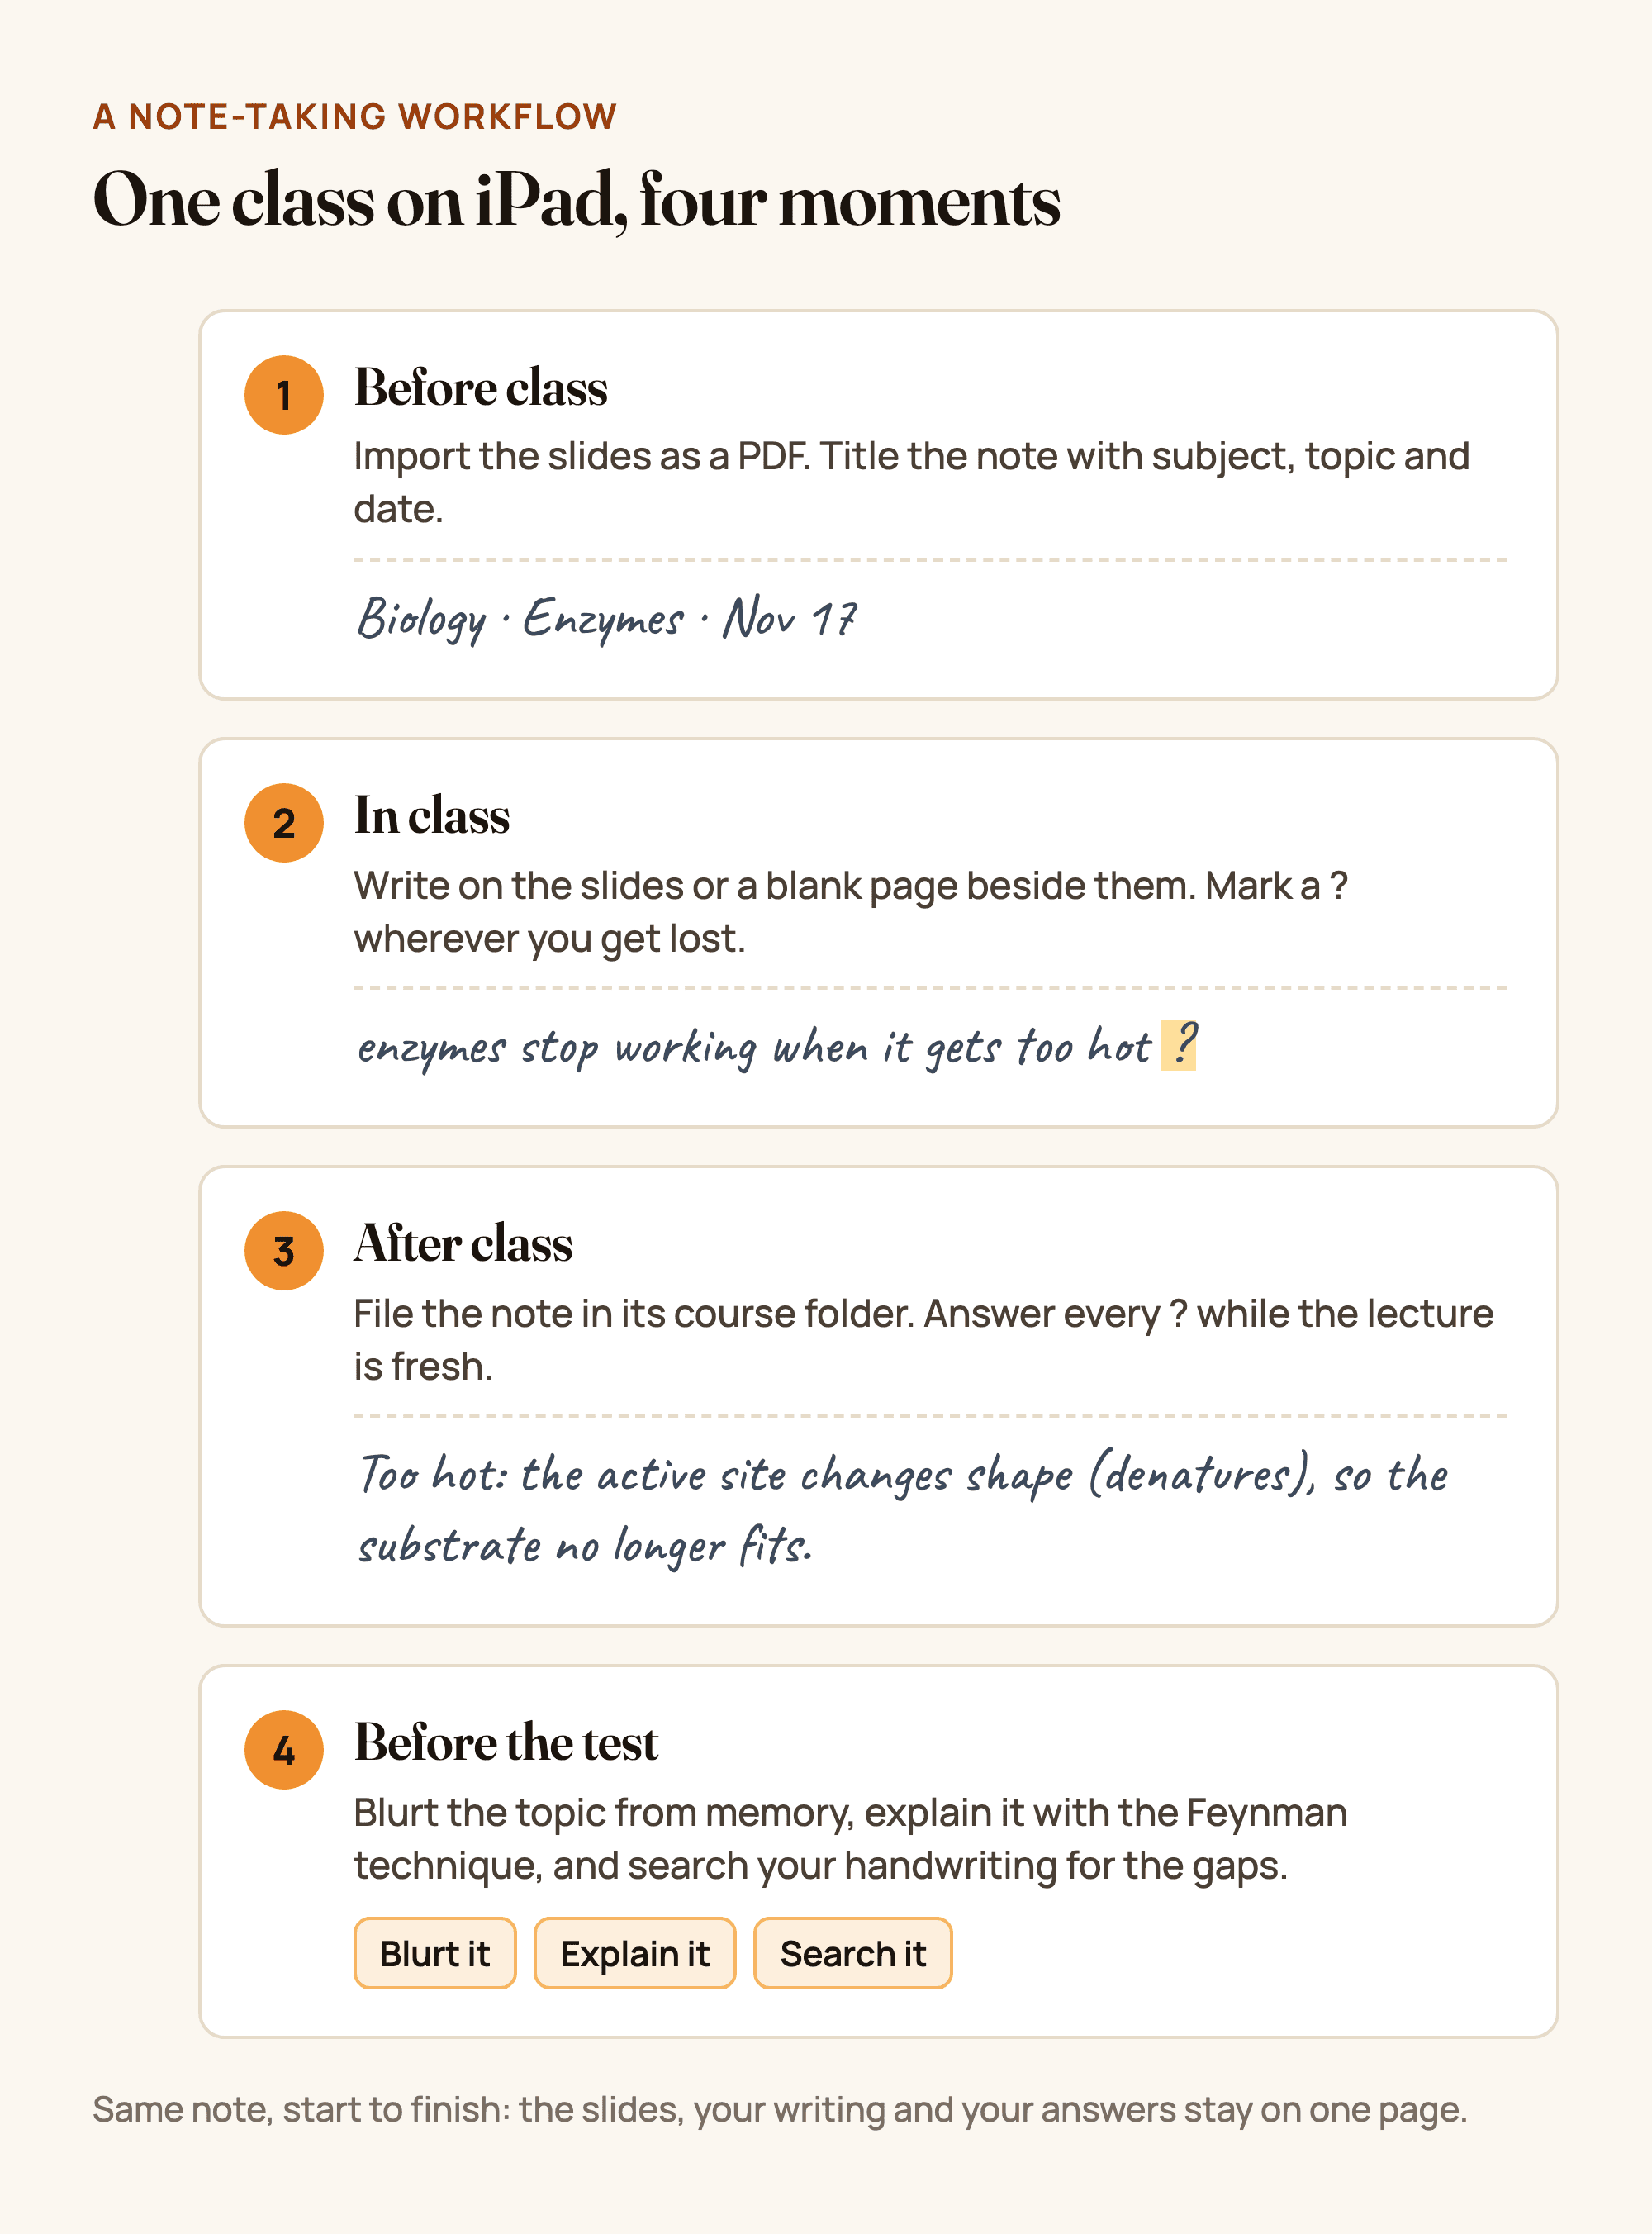
Figure 1. One class on iPad in four moments: before class, in class, after class and before the test. An original diagram, not a product screenshot.
- Before class: import the slides as a PDF and title the note with the subject, topic and date.
- In class: write on the slides or on a blank page beside them. Mark a ? wherever you get lost.
- After class: file the note in its course folder and answer every ? while the lecture is fresh.
- Before the test: blurt the topic from memory, explain it in plain words, and search your notes for the gaps.
What you need to take notes on an iPad
- An iPad that supports an Apple Pencil. Almost every current iPad does, but each model works with specific Pencils.
- An Apple Pencil or another stylus. Apple sells several models, and which ones work depends on your iPad, so check Apple's Pencil comparison before you buy. Cheaper styluses such as the Logitech Crayon work with many iPads but have no pressure sensitivity.
- One note-taking app. Apple Notes is already installed; dedicated apps add notebooks, templates and PDF tools (step 2).
- Optional: a matte screen protector. It gives the glass a paper-like grip, which many people find easier to write neatly on. The trade-off is a slightly less sharp screen and faster wear on the Pencil tip.
Step 1: Set up your Apple Pencil
Pair it
How you pair depends on the model. The Apple Pencil Pro and Apple Pencil (2nd generation) pair when you attach them to the magnetic connector on the side of a compatible iPad. The Apple Pencil (USB-C) pairs over a USB-C cable. The original Apple Pencil (1st generation) pairs by plugging it into an iPad with a Lightning port, or through Apple's USB-C to Apple Pencil Adapter and a cable on iPads with USB-C.
Change three settings
Open Settings > Apple Pencil:
- Only Draw with Apple Pencil. Turn it on so your finger scrolls and your Pencil writes. This is the single biggest fix for stray marks from your hand.
- Double-tap or squeeze. On Pencils that support it, set the gesture to switch to the eraser (or to your last tool), so you never reach for the toolbar mid-sentence.
- Scribble. If you also type into text fields by handwriting, leave it on; if it gets in the way, turn it off. To turn notes you already wrote into typed text, see how to convert handwriting to text on iPad.
Start a note in one move
Swipe up from the bottom-right corner of the screen with your Pencil to open a Quick Note from anywhere. On the Lock Screen, tap the screen with your Pencil to start a note in Apple Notes (you can choose this in Settings > Notes). Both are handy for a thought you will file properly later.
Step 2: Pick a note-taking app
Pick one app and use it for every class; switching apps mid-semester scatters your notes. A quick guide to the most common choices:
| App | Good fit if you want |
|---|---|
| Apple Notes | Free, built in, simple folders, and handwriting that syncs to your iPhone and Mac |
| Goodnotes | A notebook-style library, paper templates and strong PDF markup |
| Notability | Audio recordings linked to what you wrote during the lecture |
| Microsoft OneNote | A free notebook that also runs on Windows, if your school uses Microsoft 365 |
| Wren | AI that answers in ink on your handwritten page: write or sketch, pause, and it adds the graph, formula, diagram or next step |
For prices, devices and AI features app by app, see our best note-taking app for iPad comparison of nine apps. For apps beyond notes, such as drawing, PDFs and flashcards, see the best Apple Pencil apps for students.
Step 3: Choose your paper and template
Digital paper is free, so match it to the subject instead of using one notebook style for everything:
| Paper | Best for | Why |
|---|---|---|
| Ruled (lined) | History, English, law, languages | Keeps long passages of writing straight and readable |
| Grid or dotted | Math, physics, chemistry, economics | Lines up equations, columns and sketched graphs |
| Cornell layout | Lecture-heavy courses you will review | A cue column and a summary box turn the page into a self-test |
| Blank | Diagrams, mind maps, biology processes | Nothing to work around when you draw |
| The slides themselves | Classes that share slides in advance | You write beside the exact slide the lecturer is talking about |
Most apps let you change the paper of a single page, so a math note can switch to blank paper for a diagram and back.
New to the Cornell layout? Cornell notes, with a free template shows how to fill one in, step by step. For math, Math Notes on iPad explains what Apple's built-in Math Notes solves and graphs, and where it stops.
Step 4: Set up folders before the first lecture
A little setup now saves a lot of hunting before the exam:
- One folder or notebook per course. Not per week, not per semester.
- A consistent note title: subject, topic, date, such as "Biology · Enzymes · Nov 17". Titles are what you will search and sort by.
- A small colour code, used the same way in every class. For example: dark ink for notes, one colour for key terms, one for ? marks and questions. More than three colours stops meaning anything.
- One note per lecture, so each title points to one session.
Step 5: Take notes on lecture slides and PDFs
Writing directly on the slides is the biggest advantage the iPad has over paper:
- Download the slides before class from your course site or email.
- Import them into your note app with the Share button or from inside the app via the Files app.
- Write on the slides during the lecture: underline what the lecturer stresses, add the examples they give out loud, and circle what you don't follow.
- Insert a blank page after any slide that needs more room, such as a worked problem.
- Use split screen if your app and iPadOS version allow it, with the slides on one side and a blank note on the other.
For readings, the same idea applies: import the PDF, highlight sparingly, and write your own question in the margin next to each highlight. A highlight without a note is easy to forget.
Step 6: Write fast and neatly on iPad
Handwriting on glass takes some getting used to. What helps:
- Write slightly bigger than on paper. Small handwriting is harder on a slippery surface; you can zoom out later.
- Slow down a little and abbreviate more. Use symbols (→, ↑, ≈, ∴) and short forms you will recognize later.
- Try a thinner pen and a darker colour. Thin lines look neater and stay readable when the page is zoomed out.
- Use the lasso tool to fix layout after class, not during it: move a diagram, resize a line that ran into the margin.
- Use grid paper while you learn to keep lines straight, then switch back if you prefer.
- Rest your palm on the screen. With Apple Pencil, palm rejection handles it, so write as you would on paper.
Step 7: Find anything you wrote later
Handwritten notes are only useful if you can find them again. Most major iPad note apps, including Apple Notes, Goodnotes and Notability, can search handwriting as well as typed text. Make it work for you:
- Write key terms clearly, even when the rest is messy, since those are the words you will search for.
- Use the same name for the same thing across notes ("mitosis", not "mitosis" in one note and "cell division" in the next), so a single search finds every page.
- Search by topic before a test and scan every page where it appears, including the ? marks you answered after class.
Step 8: Turn your notes into a study session
The point of notes is the test, not the notes. Two techniques work especially well from a page of iPad notes:
- The blurting method. Close the note, write everything you remember about the topic on a blank page, then check it against your notes in a second colour. How to blurt, step by step.
- The Feynman technique. Pick one concept from the notes and explain it in plain words on a blank page until there are no gaps. The Feynman technique, with a worked example.
Spread these over days rather than one evening, and start each round from a blank page. For seven more methods and when to use each, see note-taking methods compared.
Make it yours in Wren
Wren is a note-taking app built around one moment: you write on the page, pause, and the page answers. Here is the routine above in Wren.
- Write your notes with Apple Pencil. Open a note in Wren on iPad and write the way you would in any notebook app. On a laptop, open the Wren web app in any browser with the same account, and type or sketch on a whiteboard page.
- Pause on a question and let AI answer in ink. Write the question where you got lost, such as "why do enzymes stop working when it's too hot?" or "graph y = x² − 4", and pause. Wren's AI answers in ink on the same page: the explanation, a formula, a labelled diagram, a graph or the next step of a solve. In the web app, Ask Wren also answers questions about the open page.
- Keep what helps, discard the rest. Every addition arrives as a draft beside your writing. Keep it and it stays on the page with your notes; discard it and the page is exactly as you left it.
TRY IT ON A REAL PAGE
Watch Wren's AI write the page. Then make it yours.
Wren’s AI writes this page in real ink, stroke by stroke. Save it to your Wren notes and keep writing on it, on the web or on iPad.
Wren’s AI writes the page here.
Make it yours.
This is real ink, not a picture. Save it to your Wren notes and it becomes your page.
- Write your own notes next to it
- Erase or move any line, box or diagram
- Ask Wren's AI to explain or extend it
Free to start. One account for Wren on the web and on iPad. More pages to try
PAUSE YOUR PEN
Write. Pause. Wren's AI answers on your page.
No chat window to copy from. Wren reads what is already on the page and adds the next part in ink, right where you are working.
- WriteOn iPad, write with Apple Pencil. On the web, type or sketch on a whiteboard page.
- PauseStop for a moment. Wren reads what is on the page.
- AI answers in inkWren's AI adds the graph, formula, diagram or next step on the same page, in ink you can edit.
Rather ask a question? On iPad, open Study Buddy: it reads the page and can add its answer in ink. On the web, Ask Wren answers questions about the open page.
ASK CHATGPT OR CLAUDE
Set up a note from ChatGPT or Claude
Connect Wren to ChatGPT or Claude once. Then ask in the chat, and Wren writes the page into your notebook in ink, ready to edit on the web or on iPad.
Paste this into ChatGPT or Claude
Create a note called "Biology: Enzymes" in Wren with a study page on how enzymes work and a labelled diagram of the active site.
- Connect WrenAdd the Wren plugin in ChatGPT, or add Wren as a custom connector in Claude. Sign in to Wren with your email or Google.
- Paste the promptYour AI finds the note by its title or subject, or starts a new one, and Wren writes the page.
- Keep writingOpen the note in Wren. The page is real ink: write next to it, erase or move any part.
Your AI sees note titles, subjects and page lists, not the writing on your pages. It adds pages and can redo pages Wren wrote; it never changes what you wrote. The ChatGPT plugin is available in the US and Canada.
Common mistakes when taking notes on iPad
- Trying to write everything. Notes are for the ideas and examples, not a transcript. Slides already hold the text.
- Using a different app for every class. One app, one library, one search.
- Leaving Only Draw with Apple Pencil off. Your hand will leave marks and scroll the page by accident.
- Decorating instead of reviewing. A beautiful page you never revisit teaches less than a messy page you blurt from twice.
- Never answering the ? marks. They are the most valuable thing you wrote, and they are cheapest to answer the same day.
- Keeping notes only on the iPad. Turn on your app's sync or export your notebooks now and then, so a lost iPad doesn't mean lost notes.
- Letting notifications in. Turn on a Focus mode for class so messages don't land on top of the slides.
Keep reading
- Best note-taking app for iPad (2027): nine apps compared on writing, AI, devices and price.
- Best note-taking apps of 2027: twelve picks for every device, if your laptop matters as much as your iPad.
- Best handwriting to text apps (2027): the apps that turn what you wrote into typed text, free and paid.
- How Wren adds AI ink to handwritten notes: the write, pause, review loop in detail.
- Wren on Windows, Chromebook and Android: your iPad notes in the browser on your laptop.
Frequently asked questions
Do I need an Apple Pencil to take notes on iPad?
No, but it helps a lot for handwritten notes. Without one, you can type with the on-screen or a hardware keyboard, or write with a finger for short notes. Cheaper styluses such as the Logitech Crayon work with many iPads but have no pressure sensitivity. Check which Apple Pencil your iPad supports before you buy one.
What is the best app for taking notes on iPad?
It depends on the job. Apple Notes is free and built in. Goodnotes and Notability are full notebook apps with PDF markup, and Notability links audio recordings to your notes. Wren adds AI that answers in ink on your handwritten page. Our comparison of nine iPad note apps goes app by app.
Is it better to take notes on an iPad or on paper?
Handwriting on an iPad is still handwriting: you decide what to write and how to lay it out, just as on paper. The iPad adds what paper can't: writing directly on lecture slides, searching your handwriting, undo, moving things around, and every class in one device. Paper still wins on cost and on having no distractions.
How do I write neatly on an iPad?
Write a little bigger and slower than on paper, use a matte screen protector if the glass feels slippery, try a thinner pen in your app, and use your app's zoom or lasso tool to tidy up afterwards. Grid paper helps keep lines straight until it becomes habit.
How do I take notes on lecture slides on iPad?
Download the slides as a PDF before class, import them into your note app from the Files app or with the Share button, and write on the slides as the lecture goes. Add a blank page after a slide when you need room. If your app supports it, split the screen so the slides and your notes sit side by side.
Can I take handwritten notes on iPad and see them on my laptop?
Yes, if your note app syncs to an app or website on your laptop. Wren notes sync between the iPad app and the Wren web app, which runs in any browser on Windows, Chromebook or Mac with the same account. On the web you type or sketch on the page, and AI answers in ink.